Thursday, April 14, 2011

Antivirus Protection, Where to Get the Best Products Tutorial Blog

In the age of the computer, we have to keep ourselves from being attacked by  malicious computer viruses.  JR Lang in his e-zine article “Do You Know the Dangers - Guide to Types of Computer Viruses & Malware” states that “surfing the internet without Malware Security is like walking through a hospital without an immunes system.” Viruses can attack your computer and renderer it unusable along with destroying important data saved on it.  There is no reason a computer owner should not protect themselves with the relatively affordable products on the market.  I will show you the top rate brand of antivirus software for 2011 and where to get it on the internet.  I will also provide an example of the top rated free product available to those who have a tight budget to think of.
For more information on the article “Do You Know the Dangers-Guide to Types of Computer Viruses & Malware” please check the link for the EZINE Article below.
Accessed 14 April 2011
When using the search engine Google I quickly found the top ten ranked antivirus programs on the web at the website http://anti-virus-software-review.toptenreviews.com/ppc-index.html?cmpid=15899 . I will briefly guide you through the cost and where to find the top antivirus program online.
BitDefender Antivirus takes the number one spot based on toptenreviews.com.  There website at http://www.bitdefender.com/ has a great comparison tool that allows you to choose which product meets your needs and price range.
Accessed 14 April 2011, Screen Capture BitDefender Antivirus

Their best product that can be purchased online for one year and for up to 3 computers is the BitDefender Total Security 2011 for $79.99.  This program is the “Cadillac” of the three antivirus products they have.  It even has an application for the I-phone that allows users to view their kid’s activities online via their telephone. The product can be purchased online or if you would like to save some money, it can be purchased from Wal-Mart for $64.98 and a two year user agreement.  That would break out the cost to roughly $32.49 per year.
Picture downloaded 14 April 2011, Google Images

Both Geek.com and About.com recommend AVG Antivirus as the best free program on the internet.  To download this antivirus program for free follow these simple steps below.
Screen Capture free.avg.com, Accessed 14 April 2011

2. Click on the “Download Now” for the free Product
Here comes the sales pitch to upgrade to the pay service.  Again if you have to pay anything why not go with the number one product on the market which is a similar price to this product.
Screen Capture free.avg.com, Accessed 14 April 2011

3. Click “Download” under the free column on the far right.
4. Click “download AVG Antivirus free” from AVG.
Screen Capture free.avg.com, Accessed 14 April 2011


5. Click “Run” in the pop-up box.
6. Follow the setup wizard and enjoy your new free antivirus.
Protecting your computer and keeping it a viable tool is important.  Use the best Antivirus you can afford, be it $79.99 or free.  With an estimate 1,017,208 Malware programs known of in early 2010 by www.linuxtoday.com , there are plenty of reasons to protect your computer.  Please ask if you need any additional information to find a quality product. 

Sunday, April 10, 2011

"Encrypted Email Project/Secure Email Blog

This week’s ISM3004 project consisted of creating a secure email, which is better called an encrypted email, and finding a case in the public market to show how important encryption of email is.  The hardest part of encrypting email was the time it took to download the free certificate from the security provider.  I will briefly show some screen shots from the process with a short explanation based on our ISM 3004 project instructions given by our University of Florida professors.  I will also show how important encrypted email can be when dealing with personal and private information by giving a brief synopsis of the article “Unencrypted email implicated in Geisinger patient data breach,” by Sandra Yin.
The process of setting up a secure email from home is rather simple.  The instructions given in our project had us head to http://www.mozilla.com/firefox to download Firefox free if we did not have it.  The picture below is of the homepage from the link.  The process of downloading is very simple and will guide you through, just click “Firefox Free Download” as our ISM3004 instructions lead us to do.

Screen Capture on 9 April 2011

After setting up Firefox on my computer the project had us http://mozila.com/thunderbird and setup Thunderbird and tie it to our University of Florida student email account.   The download was easy using Windows 7 on my computer because it guided me step by step and pulled in all of my email settings from the account.  All I really had to do was to follow the setup wizard and then enter my email address and password and I was done.  

Screen Capture on 9 April 2011


Next I went on to http://verisign.com/authentication/digital-id/index.html and followed the assignment instructions to get a free email certificate.  Our professors clearly explained to us click on the buy option and then select the 90 free trial.  The next steps were to ensure that you select high grade for encryption and follow the setup wizard.  Once done you will receive a verification email to finish the process by copying your “Digital ID Pin” and pasting it in the appropriate box.
Screen Capture on 9 April 2011
Email from Verisign.com

The next part was the hardest for some reason.  You need to go to Firefox and download your certificate and back it up to upload into Thunderbird to use.  The steps given to us were as follows:
1. Click Tools/then Options
2. Advanced then Encryption
3. View Certificates
4. Click Backup
These are all easy except for the fact it took me nearly ten minutes to find the toolbar on Firefox.  After using Google I found a common issue with computers loaded with Windows 7 is that for some reason tool bars on Firefox are hidden.  The good news is that clicking the ALT key brings it back up.  This was a simple answer that saved me from a lot of frustration in the end. 
In the next step import the certificate to the Thunderbird email account.  In Thunderbird follow these simple steps.
1.  Open Thunderbird
2.  Click Tools then Account Settings
3.  Click Security
4.  Click View Certificates and Your Certificates
5.  Select your Backup file done in previous step
6. Type password previously selected in last setup
7.  Select it and click Yes for signing and encrypting with Certificate
8. Then OK
Next we had to get the key for our professor’s email.  Do this by sending them a signed email and ask for a signed back.  To ensure your email is signed click on the lock icon’s drop down box and select digitally signed email. Here is a picture of my email to the class professors.


Screen Capture 9 April 2011 of Email sent to ISM Professors,From Thunderbird email account via UFL.EDU Student Email

Once Dr. Means emailed me back a signed email I followed the project instructions to open it, click on "from" on the email, and then saved her key in my contacts box which allowed me to send her and encrypted email.  When sending the encrypted email just simply use the contact created in the "to" box and then click the drop down for the lock icon and select digitally encrypt.  This is the sent encrypted email and also a screen capture of my inbox.
Screen Captures 9 April 2011, From Thunderbird email account via UFL.EDU Student Email


Now why would you care about encrypting your email to someone?  The answer is relatively simple.  If you do not encrypt your email others may be able to see its contents.  This is very important when dealing with medical information, company policies that may be private and personal data that may cause risks of identity fraud.  These are things in the corporate and private world that are important to keep private.  Simply spending a few minutes encrypting an email will help protect data that others should not have access to.

On the website http://www.fiercehealthcare.com/story/unencrypted-email-implicated-geisinger-patient-data-breach/2010-12-29 I found the article ““Unencrypted email implicated in Geisinger patient data breach,” by Sandra Yin.  This article explained how a doctor working for Geisinger Health System sent an unencrypted email to his home email address with protected health information of about 2900 patients.  Though the information had medical and other pertinent information on these patients the article stated “it appeared to have no financial information.”  The doctor at fault, David Schaefer, had to contact his home email provider to get this item deleted off its network. 
The company states that it believes no one had seen this information other than the doctor who sent it.  It does appear that the doctor is no longer employed by Geisinger Health System.  One can only speculate to the reason of this, but having 2900 upset patients knowing that they have their personal health information at risk may be the cause.  Please encrypt your information that you must protect from prying eyes.  If you feel that something in an email may cause issues spend the extra time to encrypt it.  It is always better to be safe than sorry, or potentially unemployed. 

Additional Sources:
“Secure Email Project Instructions.”  ISM 3004 Course, University of Florida.  Downloaded and used as reference for project on 5 April 2011.  Professors:  Dr. Means and Dr. Olson

Sunday, March 27, 2011

Social Networking, Facebook Style/Tutorial Blog 3

Social Networking: Why and How to Use Them
Everyone has heard of Facebook, Twitter, YouTube, and LinkedIn.  These giant social networking websites are the hottest ways to stay in touch with friends, look at future hires, and now some believe the next wave of advertising.  In Joseph Booysen’s article “Social networks the new site for business,” on www.iol.co.za, he interviews the marketing director for Woolworth’s.  Charmaine Huet realizes the market offerings that these sites have along with the sheer number of customers that can be reached. She has even gone as far as monitoring Twitter on what people were saying about Woolworth’s sales and offerings.  A tool that can give direct feedback as the sale is happening in the store is awesome in the business world. 
If you are interested in reading up one the article please follow this link:
“Social networks the new site for business” by Joseph Booysen, Accessed 27 March 2011.
Having instantaneous feedback is valuable and allows these businesses to adapt and ensure their plans for success are hitting the marketplace in the right manner.  Companies can advertise and reach the right market audience with any of these social networking tools.  Since I plan on teaching you how to start a simple Facebook account today in this blog I thought it might be useful to show you the link for advertising on this site.
Advertise on Facebook Link: Picture is a screenshot from the link below, accessed 26 March 2011.


The reason I choose to teach how to create a social networking account is because this is something I recently did.  Being a distance learner at the University of Florida has great advantages for full time workers but can be challenging at times as a student.  I am in difficult courses this semester and needed help in the form of tutoring.  Luckily I found a tutoring site and learned that I could watch tutor videos through the social media site Facebook.com.  This is a win-win for me and the business that is offering the tutoring. 

Even though the process only takes a minute, I feel it is important for everyone to have a Facebook account.  You will only need about five minutes and a current email account to begin.  This page is where the magic happens.
"Facebook Main Page" Accessed 26 March 2011, Screenshot from link below:


Enter your first and last name, then your email address, verify you email address, and create a simple password.   The next page will be a security check where you will simply retype the words on the screen in the given text box and click “sign up.”  Now the last step is logging into your personal email account to get the confirmation email.  Follow the directions in the email and you are now a member of Facebook.
Yes, it really takes less than a few minutes to create your own personal account.  Once into the website you can begin to search for friends, edit your profile (see picture below), and even join causes that you support.  You set what others see about your profile.  Please remember to be diligent and respectful on Facebook because one day a future employer may peak at it during the hiring process.  You would not want your status to be “Floated another keg last night with my roommate!”  Yes that is impressive, but no you do not want your future employer viewing that side of you right off the bat. 

"Edit Profile in Facebook," Screenshot inside personal account on http://www.facebook.com/ , Accessed 26 March 2011.

Since you have created your account now and are on the website let us look at how to begin creating your personal content.  Simply click the box that reads “Edit Profile” to begin (picture above will be next view).  When editing your profile just select one of the nine heading on the left; Basic Information, Profile Picture (you can upload this in seconds), Feature People, Education and Work, Philosophy, Arts and Entertainment, Sports, Activities and Interests,  and finally Contact Information and fill in the blanks or drop downs provided for you.  Do not worry, you will not have to fill it all in or share your whole life’s story, just what you want others and your friends to see about you.  Now you can simply type in the search box names of friends, causes that interest you, or businesses that you want to find and let Facebook do the work.  Another option is to select find friends.

Finally, in editing your personal account let us look at the area where you can tell all of your friends about “floating that keg”, your status update.  Click on Home when logged in to your account.  Then on the middle of the screen you will see a box that reads “What is on your mind?”.
"Update Your Status,"  Screenshot "What's on your mind?"  http://www.facebook.com/  Accessed 27 March 2011.

 This is where you can enter text that shares what you are thinking and feeling at the moment.  Again be careful of what you say because other people will be able to read your status.  Once you have entered the text click share and let your feelings be known.
We have quickly reviewed how to do a personal account on the social networking website of Facebook.   The video below will put you at ease if you have any issues with the simple steps above.  It is also a simple step by step process on how to create your account. 
“How to Join Facebook” by Invisiblepeopletv
Knowing that businesses are using Facebook and other social networking sites to advertise I thought it might be helpful to show this simple screenshot and link to another video on starting your businesses account. 
“FaceBook Page for a Business,” by Lancetube01, Accessed 27 March 2011.

Get social, start social networking.  Facebook and the other social networking sites are not only fun for us to use but can bring profit to our businesses or causes we support.  Spend five minutes and be introduced to the power of social networking.  Good luck creating your account.  Please post comments to this blogs if you have questions on the process or content.  Thanks again for reading the ConfusedUFBlogger.

An Access Database Assignment and What I Learned that will Help you


Microsoft Access 2007 is a great tool to use in the workplace.  The most recent assignment for the ISM 3004 class was to use Microsoft Access, import data, create a query, create a form, and then finally a report from the data of the created query.  During this project I learned how valuable the Design View is in Microsoft Access along with how to set certain parameters in queries that make them stronger sorters of data.

Design View allows a person to adapt data to their needs.  There are too many useful tools in the view to break it down in this brief blog, but I would like to mention that without this area in Access it would not be as useful of a tool.  During the assignment of creating a database Design View was the go to screen to make it work.  Here is a screen shot from my database in design view.


I also found it useful to know how to adapt queries to get the data in the order you need it.  One major lesson I learned in the query portion of the assignment was that if you need to filter or sort more than one item, always put the key item in front by order of precedence.  It was as simple as highlighting and dragging the columns in front of one another which allowed the end product to show the needed specifications.  It sounds easy, because it is easy.
I think that this database could be made more useful by creating additional queries.  I think that the owners of the gym may want to know the average of how long most people stay as members.  They could create another query with all the members from the “Members” table and sort the join date in ascending order and then insert other functions in the Design View to see what the average length of time a member has been at the gym. 
With Microsoft Access there are so many different ways to take your data and manage it in the way you need it.  If you are looking to do a new database I would suggest just two simple things to you.  First buy Microsoft Access.  The link below takes you directly to Microsoft’s website to buy this great tool for under $140.00.  I would also recommend buying the book Access for Dummies.  The second link is directly to Amazon.com where you can purchase the book from $12.00.  It helps answer those burning questions that arise during your database build.


References:
Access Picture.  Microsoft Store Website.  26 March 2011.

For Dummies Picture. Amazon Books.  26 March 2011.

Phillips, Fred.  "Picture of Design View During Access Database Project".  Taken 25 March 2011.
 

Saturday, March 5, 2011

Presentation For a German Shepherd Rescue Organization

This assignment was tougher than most.  I feel like I spent many hours spinning my wheels but thinkl I accomplished more than I thought I could.  My presentation was really about an organization I believe in.  I wish I could have done more for the organization and plan on taking this experience with this presentation and applying what I have learned, and most all, how I can improve my skills with future presentations.

I think the flow of my presentation started smoothly.  Within the first thirty seconds I grabbed the attention of the viewers with lines like "man's best friend is in trouble" and "final fate in a high kill shelter."  I attempted to avoid clutter by trying to have bold statements without to many items on a slide.


Crisp Slide


Attention grabber

My attempt was to let the viewer see the importance of this rescue operation, German Shepherd Rescue Inc.  I tried to lead them down from why this organization exist, what is its mission, how can we help it, and finally remind them of why their help is needed.  I did not read directly from the slides but could have worked on preparing a better script.  I also was able to validate that the organization is needed by telling Charlie's story.

If I had two weeks to work on the project again I would change little with the slides or the timing of them.  I would work on the sound and potentially some animation .  All the music and the voice was original .  It is so much better to hear a crisp clean sound and feel. I feared copyright infringement and decided to make the music.  The sound quality did not turn out as well as I would have liked with my computer microphone. There are points where I could have done better vocally during the presentation.

I learned a lot more about power point and it's tools on this project.  It is a great tool and I have used it for presentations at work in the past but have gained a new respect for it after this project.  I will work on better preparation and due diligence for future presentations.
Here is the link for the  final product.....

http://www.youtube.com/watch?v=BXYE_MwXYiY


Sunday, February 20, 2011

Creating an Avatar

When I first looked over the extra credit assignments and saw the Avatar tab I was nervous.  How do I, the not so computer savvy guy, create an avatar?  I was dreading the thoughts I had of a laborous event.  I held off on starting this project until a few weeks into the semester.

Today I saw that a fellow student in the class had done their blog on creating an avatar and saw how easy it actually was.  I went to the site they had recommended, IMVU, and began the intial creation of my avatar.  After about 30 minutes I realized I was struggling a bit to get my changes to take on my avatar.   I thought  that this avatar looked more life like, but maybe there is a more user friendly site. 

After searching through the recommended sites I came across http://www.meez.com/ .  This site was easy to set up a new account and get started.  All I had to do was create an account, enter my personal information, and finally give my email address. 
Click Join Now
Select Your Avatar
Enter Personal Information
Logged In and Ready to Adapt Avatar to My Image
Once logged in I was able to adapt my avatar to look like me.  It was very simple and only took 15 minutes to change my hairstyle to bald, change my shirt to something that matches my style, and then click save to ensure all my work was properly updated.  The five tabs across the top appropriately labeled for what they do are a simple click and update to make changes.  The search block is also helpful on this site.

Here is my self image on my avatar, Philfe1.  I will definitely refer others trying to do an avatar to this simple website.

Me in Avatar Form

How to Insert A Simple Filter on Excel

After last week's exciting Pivot Table instructions I thought it might be a good time to show everyone a simple step that allows a database manager quick access to raw numbers.  I think the "Filter" tool is the most helpful thing in Excel in my day to day life as a Logistics Manager and HR guy when using Excel.  I can get the raw number fast to do projections on ordering and meeting the needs of my everchanging career.

I have created an extremely simple database that you will see below in a screen shoot.  It has three headings where I will install the previously mentioned filter.  These headings are labeled Group, Name, and Size Shirt.  Under these headings I filled in information that would be input on data gathering for this database.  Here is the initial screen shot.

Intial Data Entry with Group Labels (See Arrows)
 Now that I have the data I need to track I would like to simplify it into only Operations members that need a large shirt.  That may be easy to simply count with only 20 names in this example but dealing with 400-450 people as I do daily I need a tool to help. I am going to put a simple filter on the group headings to make this task extremely easy. 

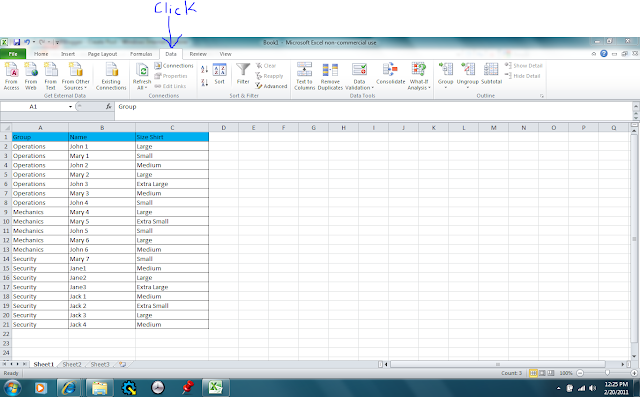
First go to the "Data" heading on the top of the Excel database and click on it.  Here is what the screen should look like.
Going to Data Tab in Excel

Next highlight A1-C1, the group headings.  Now we can install the filter for the groupings.  Simply click on the "Filter" button that looks like a funnel.  Here is what it will look like with a filter on the groupings.


Filter Applied By Highlighting Heading & Clicking on Filter


Now that we have a filter let's use it.  Move your mouse over the "Group Heading"  to the filter icon.  Select Operations out of the group. Click Okay and Excel will allow only the Operations information to show. 


Using the Filter to Narrow Your Data
 With the first filter applied, Operations, I am going to apply only large sizes next.
Further Filtering to Meet Needs
Now that we have filtered by group and size I can see that there only two people that need a size large in Operations.  Note the small print at the bottom of the next screen capture.  When each filter is applied it will tell you how many records meet your criteria. There are seven total in Operations and two for size large.
Fully Filtered Data
This is a really simple way to get a quick number of items without having to a Pivot Table in my opinion.  I actually used filtering during my previous work week to report how many people needed uniforms and their sizes.  I was able to give my direct supervisor a quick overall number based on sizes needed to be ordered and also did do a Pivot Table to make the presentation of the database nicer.  My supervisor likes the filtering because he can filter through any of the twenty functional groups we have in our area in mere seconds.

I hope this simple tool is useful to you in your daily uses of Excel.

Sunday, February 13, 2011

Excel Project

ExcelProject-12February2011
Today I am tying up the loose ends of this week’s Excel project in ISM 3004.  I am going through a step by step process to provide you, my blog follower, with a simple set of instructions of how to create a basic pivot table.  We will take a peek at the “Raw Data” used to make the pivot table first.  Next we will discuss the inputs required to make the table work.  Finally we will see the end product, the “AvgIncrease” pivot table.
The “Raw Data” is a listing of 500 individuals heart rates based on age and gender.  We take this data seen below and insert it into the pivot table by using the “Insert Tab” and select Pivot Table.  This data has been manipulated and formatted to fit the desires of a fictitious gym owner.
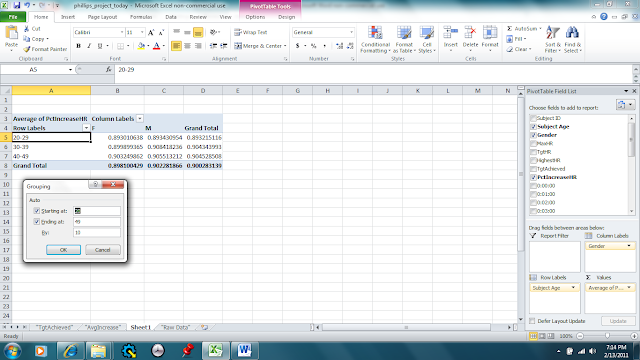
The next page that will open is a new tab on Excel.  I then manipulate the table to fit my data needs. The owner wants to see the percent of increase grouped by age and gender.  Here is a peak at how I will set up the columns, rows, and formatting to make it work.  Look at the right side of the screen shot to see the exact details on how to make the project work.

Now that you see the inputs for row labels are the subject age and the column labels are gender.  The values used are the average increase in heart rate in which I formatted as an average.  This will allow me to have a nice clean average when I format age in groups of ten, 20-29 etc.  I will do the formatting in those groups by right clicking on 20-20 in the row column, click on grouping, and then set the “By:” to “10”


Next we will meet the owner’s requirement of showing the results in percentages and blocking the Grand Total Labels.  Highlight the data in B:5/C:5-B:7-C:7, right click and then select format.  Next select percentage and ensure there is only one decimal place. The last step is to right click on both “Grand Total” headings and then click remove “Grand Total” to finish the pivot table. Here is the view of the pivot table and I hope my instructions will help others in their attempts at completing a pivot table
 

Sunday, January 30, 2011

What are some common uses for the USB Flash Drive

USB Flash Drives, Options on How to use Them: by ConfusedUFBlogger
As I searched for an ISM topic to expand on for my blog this week, I finally embraced USB Flash Drives.  These are the popular plug-n-play devices we all have used, seen, or have on our key-chains.  They are great for storing work , storing school videos to re-watch, X-Box play, and are considered an industry standard for a temporary storage device that one can take to anywhere and use data they have already created.  These devices start at around twenty dollars and have many advantages but also some disadvantages. 
The security of information held on any system they are hooked up to can be at risk; at least that is what my workplace has decided.  About two years ago the federal government decided that these helpful and handy devices were no longer allowed to be attached to their networks after security issues have arisen.  I have heard a rumor that another nation was legally using DOD computers during NATO training exercises in the United States and accessed sensitive information and it stored on a USB Flash Drive.  I am not able to verify this rumor, but have found an article that makes that rumor feasible.
In the article and also first link below by Lucas Mearian describes the plausibility of this happening and it expands on other sensitive information being lost from the hyperlink “security problems” in the eighth paragraph.  Personally seeing a Military/DOD communications representative run to a coworkers office to find out what device he had hooked to his USB port, a cell phone to recharge, and tell him he was violating DOD Ops Sec I know how serious the US Government takes the risk of these devices being attached to their network.  If you think that your company could have information that is sensitive ask your technology representative first before hooking up one of these handy devices.
Personally I use a USB Flash Drive to save all of my photos, video lectures for school, and school documents.  This saves me time when I am using either computer in my house and also space on my older laptop that is already bogged down with a lot of information.  These convenient devices are not the end solution for not having enough space on your computer’s RAM just a helpful tool to have information on your keychain.  If you want to see how one youtuber thinks you can expand RAM with a flash drive, unlikely, check out the second hyperlink below.  I also found the third hyperlink below good because it debunks the RAM expanded by flash drive myth and touches on the how and why of it. 
Finally, a good use for a USB Flash Drive, Xbox gaming.  There is always a need for fun and who would not want more space for games at an affordable price.  If you are curious of how to expand room on your Xbox for more game data please check out the last link below.  It is a short how to video that carries one through the process of adding the device to the menu of the console.
 The USB Flash Drive has a place in most of our computer applications for simple storage of projects that we may need handy for work.  The device itself is easy to use, carry, and save information to.  The only drawback to this device is to be sure that if you are going to use it at work, check to see that your company allows it first.  If nothing else the expansion of Xbox memory is a good thing.

“More flash drive firms warn of security flaw; NIST investigates” By Lucas Mearian, January 8, 2010
How to use a USB Flash Drive as RAM in Windows XP
Debunking USB Flash Drive Ram Myth
Using a USB Mass Storage Device with your Xbox 360

Monday, January 10, 2011

Computing In the Business Environment Spring 2011 Creating a URL Assignment

My first attempt at a blog for the course is here.  I don't know which direction I might take with this blog, but have a feeling I am going have tough time.  Good luck to my fellow Senior Gators, it is almost done!